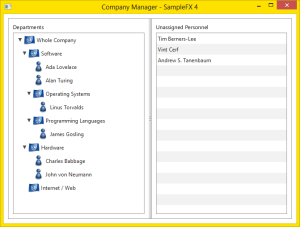
After a bit of a break away doing other things I’m back on a project that uses JavaFX 2. So far this project hasn’t required much in the way of persistence either for settings or data but a new feature I’m working on makes use of a database. I use JPA 2 for web based projects and I’ve found it to be useful in most desktop applications as well so it was the natural choice here. How you go about bringing together JPA and JavaFX isn’t necessarily as obvious as it could be so I thought I’d write a small demonstration application. While writing the demo I decided I’d also have an explore of the drag and drop features of JavaFX and get it working with a TreeView which is a bit more challenging than with the other components.
About the Application
- JavaFX 2.2 is used to provide a GUI front end to an application that sorts people into departments in a fictitious company.
- JPA 2 provide by EclipseLink is used to store the results of the operations in a Java DB database.
- Drag and drop is used exclusively to sort people into departments. There is a one to many relationship between departments and people.
- Departments can have sub-departments to any depth.
- A custom tree cell factory is used to provide editing for the tree nodes and custom context menu support.
- People can be dragged to and from the unassigned person list and between departments in the tree.
A Note
Note: before I’ve even finished writing this short series of articles I’ve decided to expand on this project at some point in the future as I think it would be useful to better develop the data model. The data model presented here will scale up to a point but for larger projects it’ll show it’s weaknesses. This demonstration isn’t really about the data model though it’s about combining JavaFX, JPA and drag and drop so I hope you’ll forgive it’s weaknesses.
File Overview
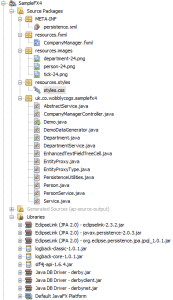
Lets start with an overview of the application and a description of how to get it up and running. The image to the left shows the file structure of the project this is a standard NetBeans JavaFX project (sadly not Maven based as the support still isn’t very good). When viewing a new project I like to have a quick look at the libraries it uses to get a feel for it and with this project I’ve tried to keep the libraries to a minimum. The EclipseLink libraries are there to handle the persistence side of the project as are the Java DB (Derby) database drivers. The other three libraries are there for logging as I’m not keen on the built in Java logging framework.
At the top of the file listing you see the persistence.xml file which configures the persistence framework. To keep things simple I’ve accepted the default on essentially everything so this file has little in it. There is one major difference when using JPA in a desktop application compared to a container such as GlassFish and that is you have to specify all the classes that will be handled by the persistence framework, other than that it’s essentially all the same in terms of configuration.
This application is super simple and has only one page to display so there is just the one FXML file. The three icons are there to provide a little visual sugar to what would otherwise be quite a dull looking application. Styling is provided by styles.css although at the moment this is empty. Finally there are the source files which are all contained in the same package.
Getting Started
To run this application I suggest you install the latest NetBeans if you don’t already have it installed and open the project in there. I realize Eclipse is probably more widely used but it doesn’t currently handle JavaFX as well as NetBeans. The project I’m providing is in NetBeans JavaFX format so although you could probably convert it into Eclipse format I imagine it would be easier to just install NetBeans. Additionally, you could run this project from a jar file but you’d need to set up the database before hand etc etc. Honestly, just run it though NetBeans it’ll be simpler 😉
Since this application demonstrates database access it requires a database to demonstrate against. The application has a persistence.xml file in the META-INF directory that is configured to point at a Java DB (Derby) database called “SampleFX4” with a user name of “app” and a password of “password”. To create this database under NetBeans:
- Click the “Services” tab in the left upper window.
- Expand “Databases”.
- Right click on “Java DB” and select “Create Database…”.
- Fill in a name of “SampleFX4” a user name of “app” and a password of “password”.
NetBeans has a basic database explorer that works well with the Java DB used by this application. If you want to watch what happens in the database as people are dragged around in the front end a query like this is quite useful:
SELECT p.id, p.name, d.name FROM APP.PERSON AS p
LEFT JOIN APP.DEPT AS d ON p.department_id = d.id;
Demonstration Download
Download the demonstration application here. It is contained in a single zip file called SampleFX4.zip. Unzip the file and open the resulting directory in NetBeans.
Next Instalment
The next instalment will discuss the JPA side of the project and introduce a helpful persistence service framework. After that I’ll be discussing the front end and how it interacts with the various entities. Finally there will be an article discussing the drag and drop features.

